Pokémon mini Development Documentation
PM2040
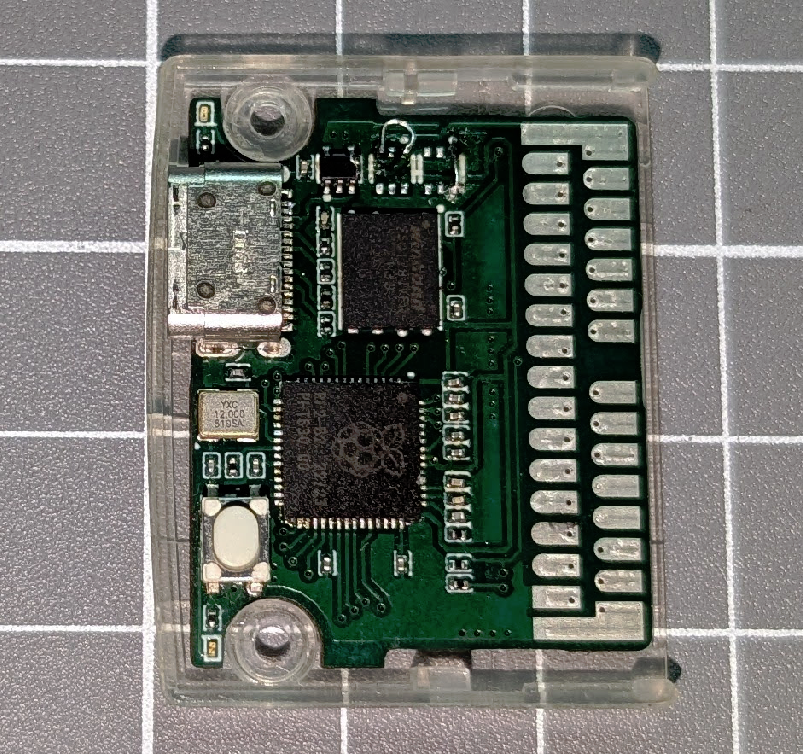
Designed by zwenergy, the PM2040 is first fully open sourced flash cart for the Pokémon mini, it uses the RP2040-Zero for a design that’s reasonable to build at home.
One of the notable advantages of this flash cart is the ease of changing its firmware, allowing for creative options like its Game Boy emulator.
Features
- Capacity: 2 MiB (normally), 16 MiB (PMini)
- Some capacity is used by the firmware
- 2 MiB: Capable of storing 2 commercial games
- 16 MiB: Capable of storing 30 commercial games in theory (firmware only goes up to 20)
- Multicart support
- On-board USB-C connector
- Simple flashing system
- Customizable firmware, you can even write your own
- Can act as a co-processor or use the PM as a dummy terminal
- Does not fit in an official case
- PMini can fit in one with some modification to the case
- Software can write to the cart from within the PM
- Requires a custom firmware
- The firmware can use the cartridge IRQ
Issues / limitations
- Like all flash carts, commercial games must be patched to play in multicart mode, which disables any mid-game sleeping functionality (like pressing the power button in the middle of a Tetris game)
- This cart has a slow wake up time and for some users, Breeder may not return from sleep properly even in single ROM firmware, requiring the use of the above patch
- Other 2 MiB flash carts can store 3 official games, but it’s limited to 2 here due to firmware taking up some space (as well as the bootloader, which always does) in addition to alignment requirements
Building your own
The instructions for building your own are on its GitHub repo but are reproduced here:
- Buy:
- An authentic RP2040-Zero, such as from here
- 100 kOhm resistors (size: 0805), such as from here
- The PCB at 1.0 mm thickness with ENIG finish, from a local printer
- Optional, but recommended: the 3D shell, from a local printer if you don’t have your own 3D printer
- Many libraries in the USA offer affordable 3D printing services!
- Pre-tin the RP2040-Zero’s 10 small contact pads on the back
- Align the pads carefully over the through-holes on the PCB and solder them down through those holes
- Solder all the castellated edges to the board
- Solder the two resistors into the R1 and R2 positions
Buying pre-made
For the standard 2 MiB version, the Cartucho by Timehero can be found on Wallapop.
The PMini is a 16 MiB version by Giltesa which can be found on his shop. This is also using the official form factor, so that it doesn’t extend out of the console.
Flashing
First you need to create a firmware to flash. There are a few options for this:
- UF2 Multi-ROM Patcher
- Dedicated single ROM patcher
- Dedicated 2 in 1 ROM patcher
- Dedicated 20 in 1 ROM patcher
Download the UF2 file this produces.
Remove your flash cart from the unit before flashing, or at least remove the battery.
Now hold down the BOOT button (FLASH on PMini) then connect the USB-C cable while keeping it held down. It will appear as a mass storage device (visible from My Computer on Windows), at this point you can release the button. Drag and drop the new UF2 onto the device.
Available firmware
Single ROM
Find the latest build of this firmware here. You can also use the dedicated patcher here.
In general, this firmware will allow the console to recover from sleep properly for games like Shock Tetris. If it doesn’t apply the sleep patches (this is an option in the firmware creators).
This firmware can contain a single ROM of a size of up to 1 MiB.
Power current consumption: ~140 mAh, ~100~120 mAh version
2 in 1 ROM
Find the latest build of this firmware here. You can also use the dedicated patcher here.
This firmware can contain up to 2 ROMs each being 512 KiB or less.
20 in 1 ROM
Find the latest build of this firmware here. You can also use the dedicated patcher here.
A special multirom firmware for the PMini and other 16 MiB PM2040s.
This firmware can contain up to 20 ROMs each being 512 KiB or less.
EEPROM manager
Find the latest build of this firmware here. Find prebuilts which include the EEPROM manager software already here.
This tool manages the entire EEPROM, not individual save slots. To manage individual save slots after backing up to your PC, use this tool by thx.
Backup
- Run the software on the console you want to backup
- Select BACKUP
- Select the slot (we’ll use 0)
- Wait until the screen says it’s DONE
- Turn off the console and remove the cart
- Connect the USB-C cable without holding BOOT
- Once connected, if using the 16 MiB version, hold BOOT (FLASH on PMini) for 5+ seconds
- Copy the EEPROM01.PME (this is slot 0) file to your computer
Restore
- Connect the USB-C cable without holding BOOT
- Once connected, if using the 16 MiB version, hold BOOT (FLASH on PMini) for 5+ seconds
- Copy EEPROM01.PME from your computer to the device (while the name doesn’t matter, it will always overwrite slot 0)
- The PM2040 will disappear from your storage list until it’s finished
- Once it reappears, you may disconnect it
- Insert the cart into the PM you want to restore to
- Select RESTORE
- Select 0
- Wait until the screen says it’s DONE
- You can now turn off the console and play the game you want
BIOS dumper
Find the latest build of this firmware here.
- Start dumping by pressing A
- Wait until the screen says it’s DONE
- You may power off the console
- Connect the USB-C cable without holding BOOT
- Once connected, hold BOOT (FLASH on PMini) for 5+ seconds
- Copy PMBIOS.BIN to your computer, probably to your pokemini folder as
bios.min
Game Boy emulator
Find the latest build of this firmware here.
The emulation is done on the RP2040 while the Pokémon mini acts as a dummy terminal. The screen is scaled down to fit and the sound quality is reduced.
The rumble function of games with the MBC5 mapper are emulated using the rumble motor when using the rumble-enabled firmware. Save games are supported but not automatically stored to flash (see below). IR functions and link cable are not emulated and things like tilt sensor would not be possible.
Controls
- D-pad A/B as expected
- C: Start
- Power: Select
- Hold C for ~3s: save SRAM contents to cart
- Hold Power for ~2s: turn off PM
Video player
A simple video player proof of concept. Find it here. Must be compiled from source in order to include the video data.
Writing from software
The standard firmware doesn’t provide a way to write to the flash cart, and you must write a custom firmware to do it.
The EEPROM manager and BIOS dumper are examples of firmware which enable this functionality.
Cartridge IRQ
For more information, see the interrupts page
A14 is hooked up to GPIO26 on the RP2040-Zero. To use it from firmware, your firmware will need to initialize this pin and set it as output; then it can write to it freely. By default, writing a 1 will trigger the IRQ in software. You will need to reset it to 0 manually, of course.
// main.c

// Pin Definitions.
// ...
#define CART_IRQ 26

void __not_in_flash_func( doPIOStuff() ) {
	// ...
	// Setup CART_IRQ pin
	gpio_init( CART_IRQ );
	gpio_set_dir( CART_IRQ, GPIO_OUT );
	gpio_put( CART_IRQ, 0 );
}

void trigger_cart_irq() {
	gpio_put( CART_IRQ, 1 );
	sleep_ms( 1 );
	gpio_put( CART_IRQ, 0 );
}
Gallery